Shard Slots determines the number of Spirit Shards you can equip at the same time in Ori and the Will of the Wisps.
If you want to know how to increase your shard slots and where to find the shard slot upgrades, then this post is perfect for you.
What are Shard Slot Upgrades?
Shard Slot Upgrades increase the number of Spirit Shards you can equip for Ori. You can obtain these upgrades by clearing combat shrines hidden across all maps in Ori and the Will of the Wisps. Clearing each combat shrine will increase your shard slots by one.
At the start, you will only have 3 slots for your Spirit Shards. And there are a total of 5 shard slot upgrades in the game. Therefore, you can potentially equip a total of 8 Spirit Shards before you have a showdown with the final boss.
You can find clues about the locations of these shrines by talking to NPCs in the game. And the sometimes come in the form of a Rumor quest.
Nevertheless, you can actually unlock the shard upgrades even without accepting any rumor quest just by finding the location of the combat shrine.
Combat Shrine Locations
Some shrines will require certain a certain ability before you can actually go to its location. I have arranged these locations based on the time you can acquire the ability requirement.
Locations 4 and 5 can be interchanged as it depends on which dungeon you chose to clear first after receiving a certain quest from Kwolok.
But you can always go back to any locations whenever you want. I only came up with the order for those wanting to obtain the shard slot upgrades for as early as possible.
| Shard Slot Upgrade | Map Location | Requirement |
|---|---|---|
| Shard Slot Upgrade Location #1 | Inkwater Marsh | None |
| Shard Slot Upgrade Location #2 | Inkwater Marsh | Spirit Smash |
| Shard Slot Upgrade Location #3 | Wellspring Glades | Grapple |
| Shard Slot Upgrade Location #4 | Mouldwood Depths | Flash Or Defeat Mora |
| Shard Slot Upgrade Location #5 | Silent Woods | Kuro’s Feather |
Location #1: Inkwater Marsh
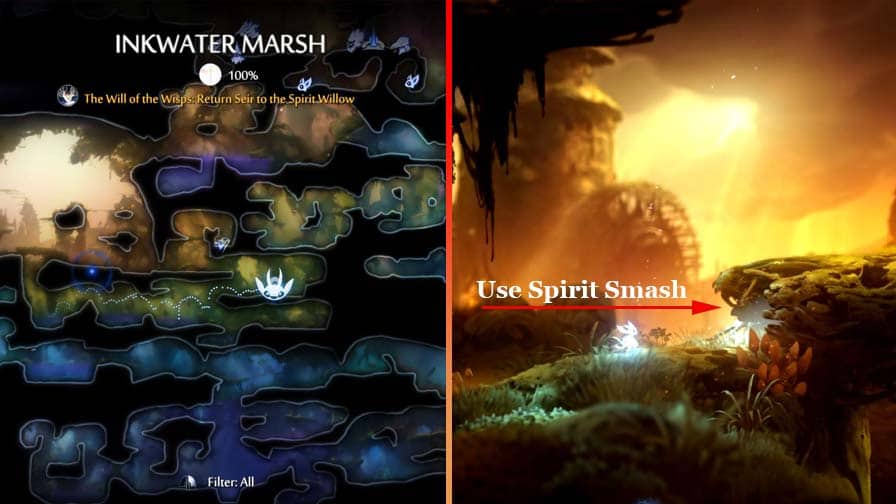
If you followed my Inkwater Marsh 100% completion guide, then you probably already acquired this slot upgrade by finishing the Inkwater Shrine Rumor quest.
If not, start from the position where Opher, the weapon master is. Note that if you missed this quest entirely and finished clearing the poisoned water, Opher will stay in Wellspring Glades.
If that’s the case for you, just check the map screenshot above to know the starting point.
Going back, you should find a huge log on the platform below Opher. Destroy it using Spirit Edge/Spirit Smash to gain access to the lower part of the area.
Next, go all the way to the right until you see an area with two jump pads. Then use the jump pads to reach the upper right platform. Once you reach the platform, just continue to the right and you should find the combat shrine.
Location #2: Inkwater Marsh (Near the lower Spirit Well)
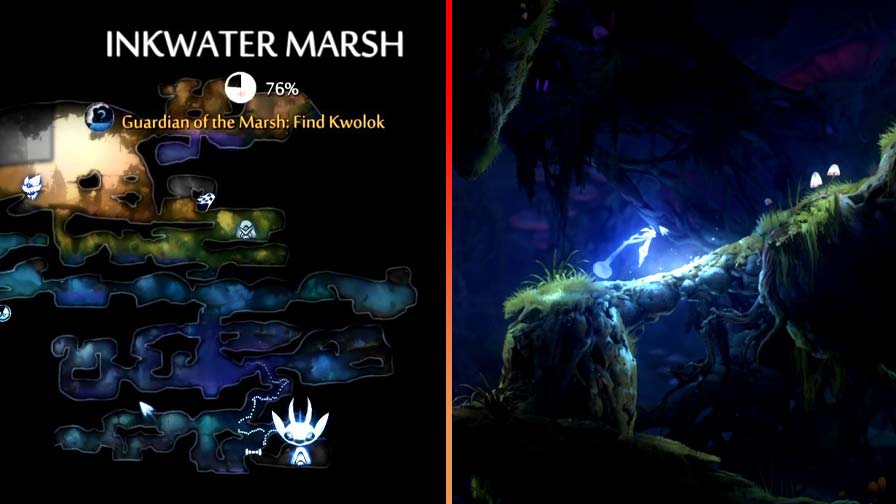
If you’ve finished The Wellspring map without getting this shard slot upgrade, then you’ll probably have two Spirit Well locations in your Inkwater Marsh map.
Choose to teleport on the Spirit Well found at the lower part of Inkwater Marsh. And from there, move to your left then go down to the lower platform where you will find a cracked stone bridge.
Use Spirit Smash to destroy the bridge and gain access to the hidden combat shrine. You will be fighting a lot of Hornet monsters in this combat shrine test so it would be easier to finish this once you obtained the Bash ability in Kwolok’s Hollow. But it is still fairly easy to clear this even without it.
I suggest getting this slot upgrade as soon as you bought the Spirit Smash ability. You should be able to purchase very early in the game through the one-time purchase discount Opher given to you, the first time you met him. This was also mentioned on the Inkwater Marsh walkthrough.
Location #3: Wellspring Glades
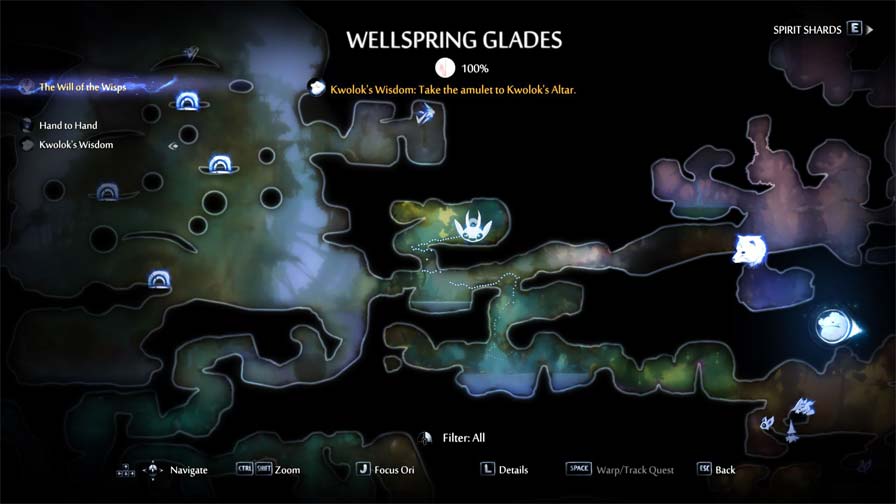
To obtain this slot upgrade, you need to have the Grapple ability to reach the combat shrine location.
You can start from the point indicated in the screenshot above. Then use Grapple to move up to the upper area.
I suggest using Spirit Arc to eliminate the flying monsters and Bash to redirect the projectiles fired by the plant monsters. You can easily kill the crab monsters with Spirit Smash too.
Location #4: Mouldwood Depths
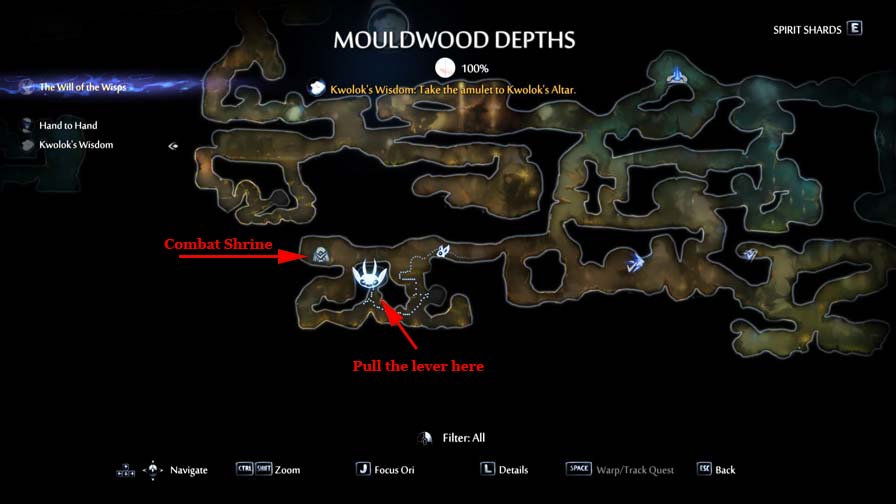
You can find this combat shrine on the area near Energy Cell Location #16.
This area is super dark and you will die if you stay in the dark area for more than 1 second. To get there, you can either wait until you defeated the boss in this area or use the Flash ability.
Defeating Mora (the boss in Mouldwood Depths) will give light to the whole dungeon so you won’t have to worry about dying in the dark. While the Flash ability will provide light, and in turn, protect you from the darkness for as long as the skill is active.
Anyway, you first need to pull a lever to open the path to the combat shrine. Just follow the screenshot I’ve provided above and you should find it easily.
The path to the shard slot upgrade will also require you to dive underwater. Having the Water Breathe ability will it easier. You can purchase the skill from Opher.
Location #5: Silent Woods
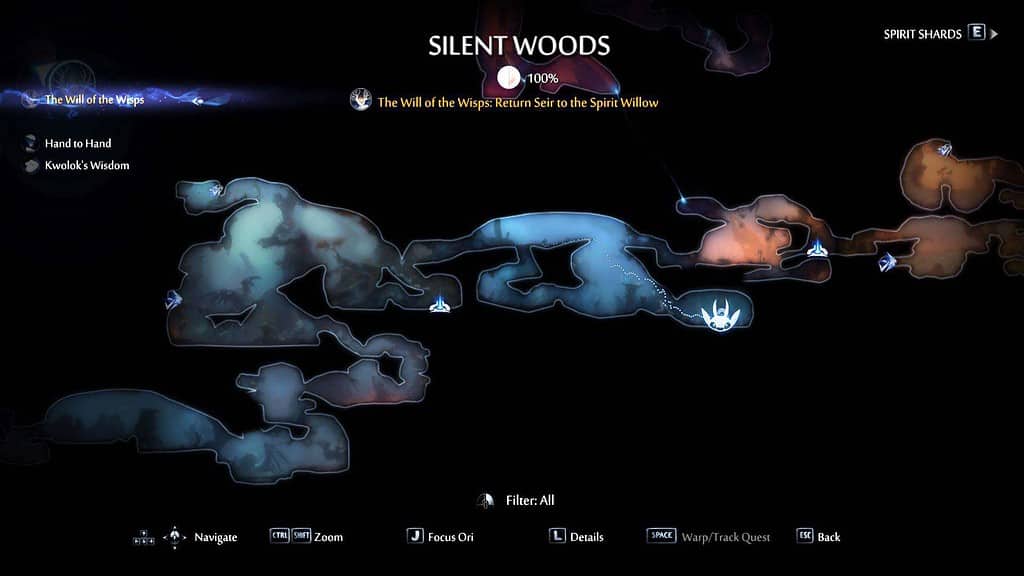
It’s not possible to get to the Combat Shrine area on your first run through in Silent Woods. Instead, you will only have access to this area once you have obtained Kuro’s Feather.
Actually, you only need Kuro’s feather to reach the location without taking any damage but it’s very possible to reach it without using it. The only problem is that this area is off-limits until you’ve finished the cinematic cut scene.
After the cutscene, you can then go to the area indicated in the screenshot above and clear the Combat Shrine trial to obtain the Shard Slot Upgrade.