In this post, I will share all the Gorlek Ores locations you can find in the world of Ori and the Will of the Wisp.
If you’ve been following my walkthroughs you probably already have some of them. A lot of them will require you to revisit previous maps once you get the required ability though.
The aim of this article is to consolidate all Gorlek Ore locations and arrange them per maps.
Video Walkthrough:
Overview of All the Gorlek Ore Locations
| Gorlek Ore | Where to Find It | Requirement(s) |
|---|---|---|
| Location #1 | Inkwater Marsh | None |
| Location #2 | Inkwater Marsh | None |
| Location #3 | Inkwater Marsh | Double Jump |
| Location #4 | Inkwater Marsh | Spirit Smash |
| Location #5 | Inkwater Marsh | Clear The Wellspring (Purify the poisoned water) |
| Location #6 | Inkwater Marsh | Burrow |
| Location #7 | Kwolok’s Hollow | Bash |
| Location #8 | Kwolok’s Hollow | Clear The Wellspring (Purify the poisoned water) |
| Location #9 | Wellspring Glades | Spirit Smash |
| Location #10 | Wellspring Glades | Bash |
| Location #11 | Wellspring Glades | Grapple |
| Location #12 | Wellspring Glades | Firemoth’s Delight or Light Burst or Launch |
| Location #13 | The Wellspring | Double Jump Dash |
| Location #14 | The Wellspring | Grapple |
| Location #15 | The Wellspring | Grapple |
| Location #16 | The Wellspring | Triple Jump (Optional) |
| Location #17 | The Wellspring | Finish Side Quest |
| Location #18 | The Wellspring | Clear The Wellspring (Purify the poisoned water) |
| Location #19 | The Wellspring | Clear The Wellspring (Purify the poisoned water) |
| Location #20 | Silent Woods | Ku’s Feather or Kuro |
| Location #21 | Silent Woods | Ku’s Feather or Kuro |
| Location #22 | Silent Woods | Ku’s Feather, Double Jump, Triple Jump |
| Location #23 | Mouldwood Depths | Grapple |
| Location #24 | Mouldwood Depths | Double Jump |
| Location #25 | Baur’s Reach | Bash, Triple Jump (optional) |
| Location #26 | Baur’s Reach | None |
| Location #27 | Baur’s Reach | Lightburst, Bash |
| Location #28 | Baur’s Reach | Lightburst |
| Location #29 | Luma Pools | Ku’s Feather, Grapple, Triple Jump (optional) |
| Location #30 | Luma Pools | Ku’s Feather, Grapple, Triple Jump (optional) |
| Location #31 | Luma Pools | Water Breath (optional) |
| Location #32 | Luma Pools | Bash, Dash, Triple Jump (optional) |
| Location #33 | Luma Pools | Burrow, Swim Dash |
| Location #34 | Windswept Wastes | Burrow |
| Location #35 | Windswept Wastes | Light Burst (optional), Bash (optional) |
| Location #36 | Windswept Wastes | Burrow |
| Location #37 | Windswept Wastes | Burrow, Bash, Dash, Double Jump, Triple Jump, Sticky (optional) |
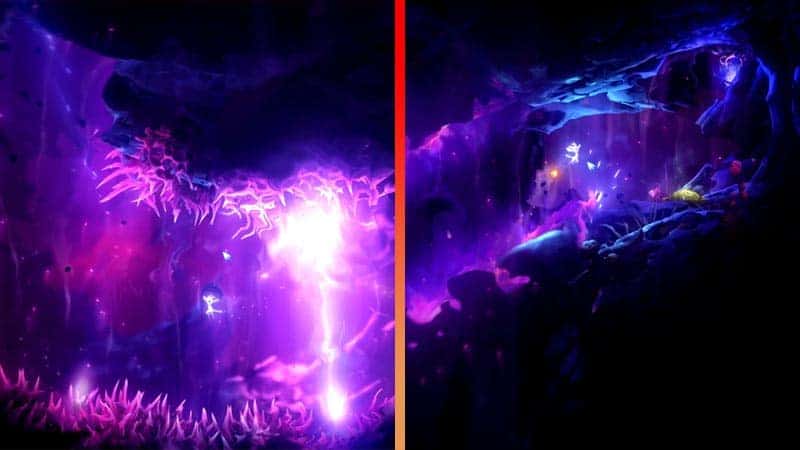
| Location #38 | Weeping Ridge | Launch, Dash, Triple Jump (Optional but recommended) |
| Location #39 | Willow’s End | Launch, Grapple, Double Jump, Dash (optional), Triple Jump (optional) |
| Location #40 | Willow’s End | Ku's Feather |
What are Gorlek Ores?
The main use of Gorlek Ores is to improve the surroundings of the Wellspring Glades by giving them to Grom, the Gorlek Builder.
You will also be needing all 40 of them if you want to finish the Rebuilding the Glades Side Quest and/or getting 100% completion for the Wellspring Glades map.
Most of them are well-hidden and are scattered throughout all areas in the game.
Take a look below to find where exactly they are hidden on each map.
RELATED: Energy Cell Locations in Ori and the Will of the Wisps
Inkwater Marsh
Location #1
Requirement(s): Finish Side Quest
You can get this by finishing the A Little Braver Side Quest in Inkwater Marsh.
Location #2
Requirement(s): Spirit Smash
You can get this while doing the Inkwater Shrine Rumor quest. You can find it at the platform above the revolving spikes with blue moss.
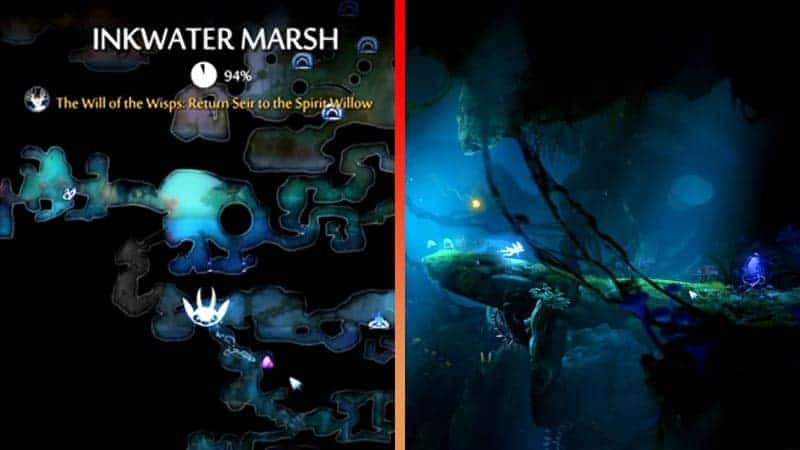
Location #3
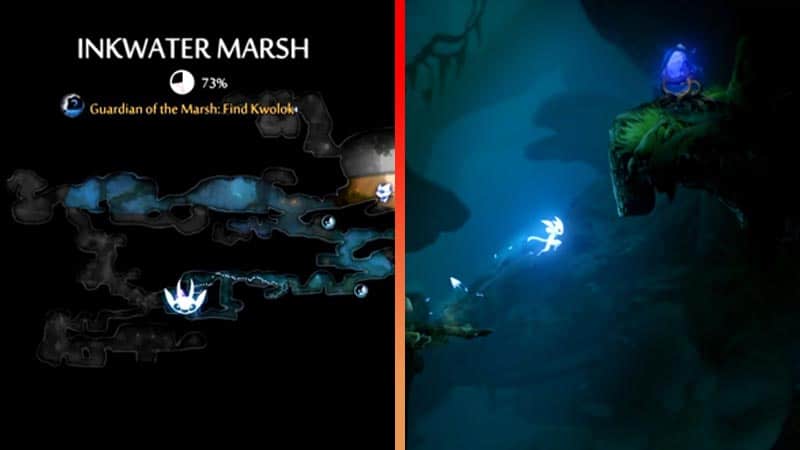
Requirement(s): Double Jump.
To get this, proceed to the area as marked in the picture above. You will need to have the double jump ability to get to the platform where the Gorlek Ore is.
Location #4
Requirement(s): Spirit Smash
There is a bone bridge and the bottom of Howl’s Den. Destroy it with Spirit Smash and get the Gorlek Ore at the platform below it.
Location #5
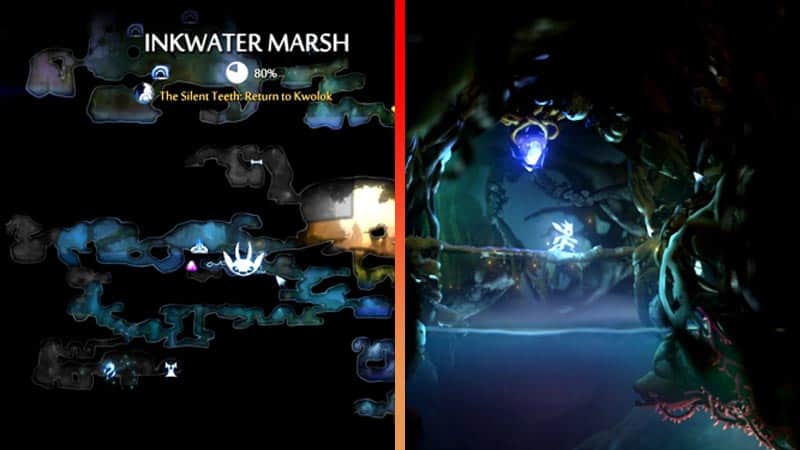
Requirement(s): Clear The Wellspring (Purify the poisoned water)
Once you finished The Wellspring map, go back to the area where you found the Resilience Spirit Shard. From there, swim down and at the end of the pathway to the left, you should get the Gorlek Ore.
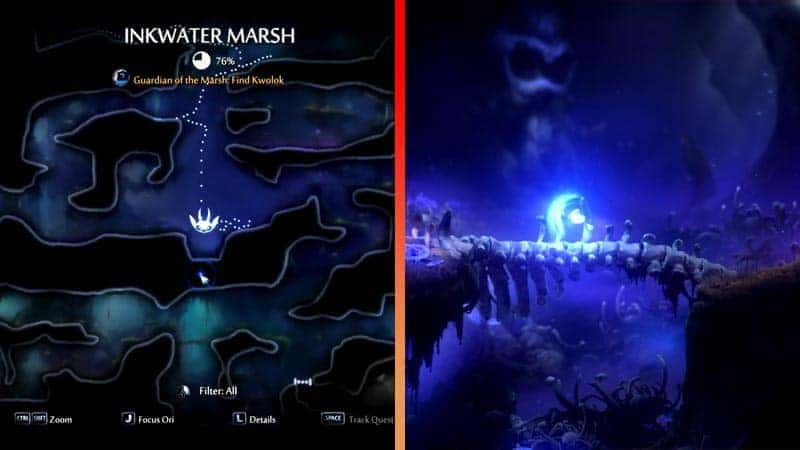
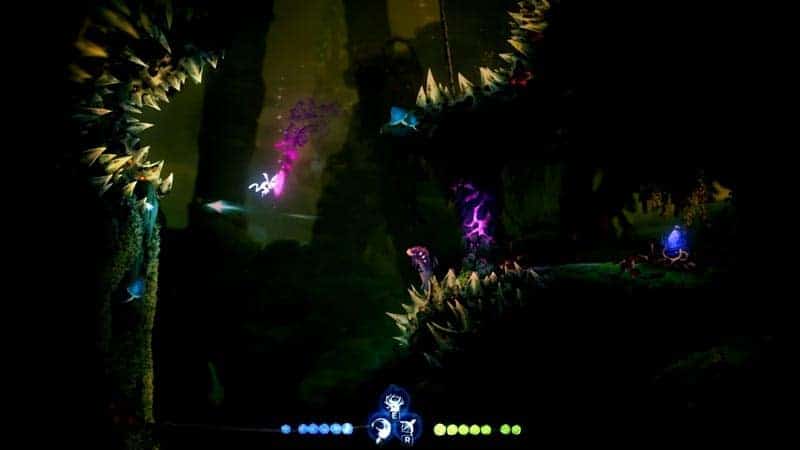
Location #6
Requirement(s): Burrow
Go to the area indicated on the map and swim down until you see sands at the bottom.
Use the Burrow to make your way out through the sands then immediately jump to the right platform where there are no thorns.
You should see the Gorlek Ore by the end of that platform.
Kwolok’s Hollow
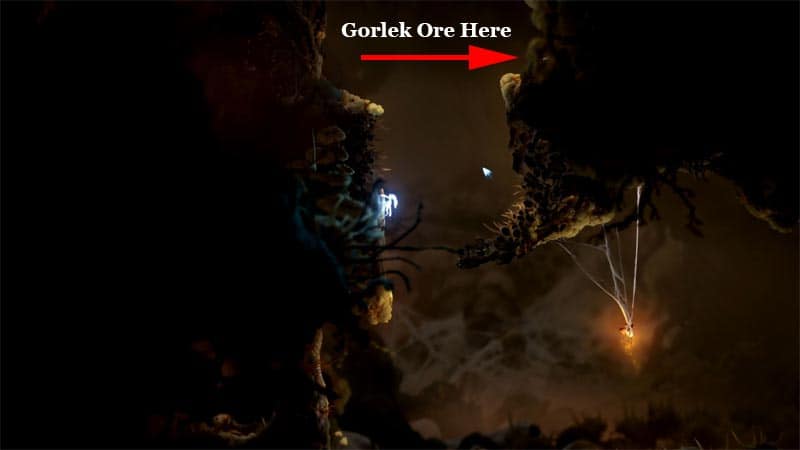
Location #7
Requirement(s): Bash
You can find this in the blocked path above the Moki who gave you the Hand to Hand side quest near the entrance of Wellspring Glades.
To get it, bash the projectile from the slug monster and redirect it to the purple cracked wall blocking it.
Location #8
Requirement(s): Clear The Wellspring (Purify the poisoned water)
You can find this from the body of water directly below Kwolok. Dive down and swim downwards until you see a path to your right.
This path will lead you upwards and at the surface, you will find the Gorlek ore.
RELATED: Life Cell Locations in Ori and the Will of the Wisps
Wellspring Glades
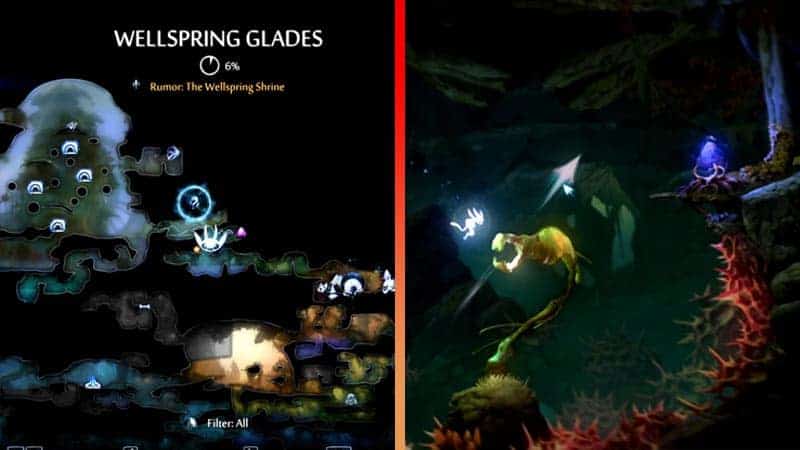
Location #9
Requirement(s): Spirit Smash
From Twillen, go to your left and you should see a cracked platform. Use Spirit Smash to enter the area below it. To your right, you should find the ore.
Location #10
Requirement(s): Bash
You can obtain this on your way up to the Wellspring from Wellspring Glades. Go to the area indicated on the map above then use your bash ability to move your way to the right. You can find it on the platform beyond the plant monster thingy.
Location #11
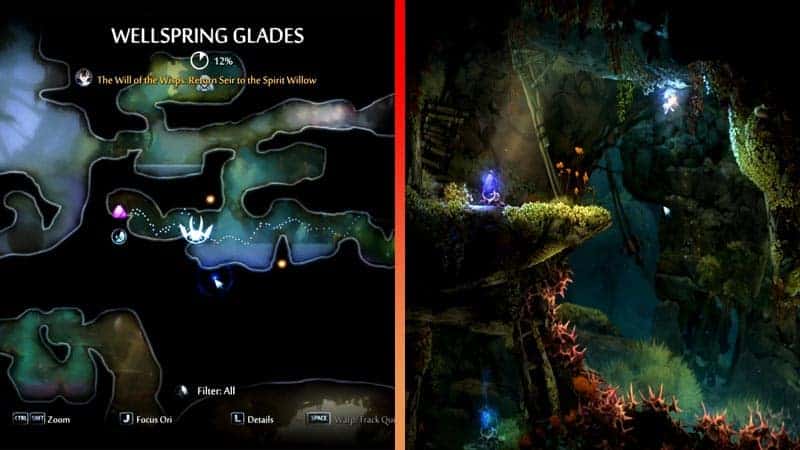
Requirement(s): Grapple
You can get this as soon as you obtain the grapple ability. Just go the area specified in the map then use your grapple ability to reach the platform at the far upper left area of the path.
Location #12
Requirement(s): Firemoth’s Delight or Light Burst or Launch
You can this Ore at the hidden platform above Motay. And there are a couple of ways to get this
The easiest way is to use Light Burst then use the Bash ability so you can reach and stick to the wall at the upper-left corner from Motay.
Alternatively, you can also plant the mysterious seed that you obtain from Mouldwood Depth. Give it to Tuley in Wellspring glades and Firemoth’s Delight plants will grow all over Wellspring Glades. This will give you “Bash-points” all over the glades, allowing you to get to higher places including this Gorlek Ore.
An even easier way is to use the Launch ability to reach higher platforms. Unfortunately, this ability can only be obtained almost at the very latter part of the game.
The Wellspring
Location #13
Requirement(s): Double Jump, Dash
At this point, you already have the two required abilities to reach the platform holding the Gorlek. Simply go to the area specified in the map and to your right, you should see a hanging pole.
Hang on it and it will open a path downwards while providing you a way to dodge the purple lasers. At the bottom, wait for the right timing when the laser is not spewing anything. Then use double jump and dash to reach the platform to your left.
Location #14
Requirement(s): Grapple
You can find this ore literally beside the Spirit Challenge altar in The Wellspring map.
Location #15
Requirement(s): Grapple
You can either go through the door where you can find Tokk (2nd highest door) then use your grapple ability to move to the far right corner of the area.
Or make your way to the highest door then jump to the right so you can fall down to the platform holding the Gorlek Ore.
Alternatively, you can also reach the platform from the entrance of The Wellspring then jump and grapple your way up to the higher platforms.
Either way, just follow the map guide in the photo above and you should be fine.
Location #16
Requirement(s): Triple Jump (Optional)
You can find this in the rotating room puzzle. Once you solve the puzzle, go to the left side where you’ll find a spinning wheel with blue moss. Ride it and propel yourself upwards so you can stick to the wall above it.
Then climb your way up and you should discover a secret area with the ore.
Alternatively, you can use the Triple Jump spirit shard so you won’t have to ride the spinning wheel.
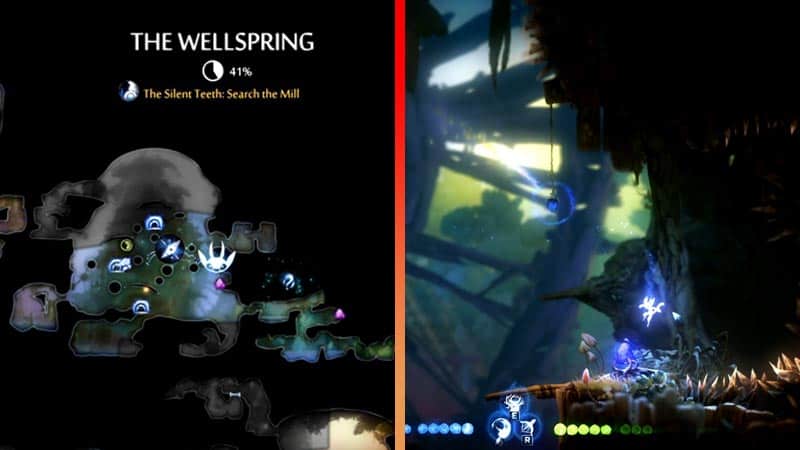
Location #17
Requirement(s): Finish Side Quest
You can get this as a reward for finishing the “The Lost Compass” side quest.
Location #18
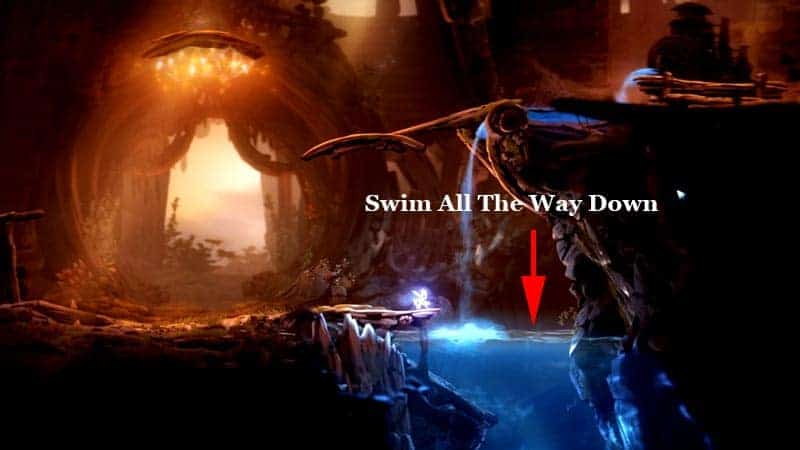
Requirement(s): Clear The Wellspring (Purify the poisoned water)
Once you purify the poisoned water, warp to the spirit well in The Wellspring. Move all the way to the right and you should now have access to the underwater area of this map.
At the very bottom, you should see the Gorlek Ore.
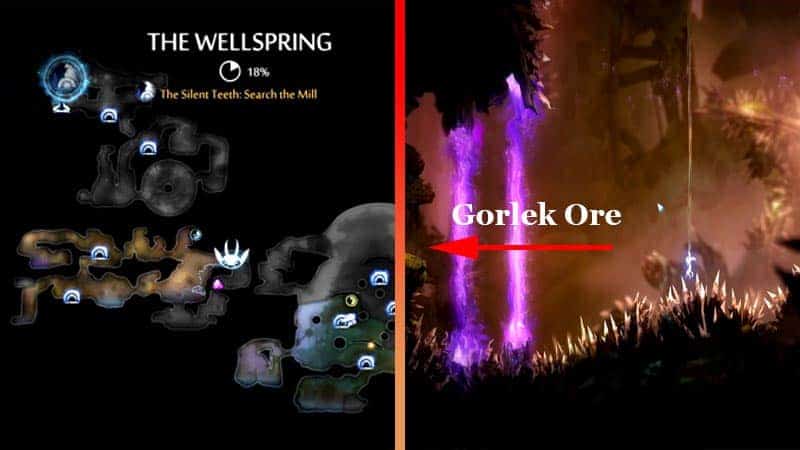
Location #19
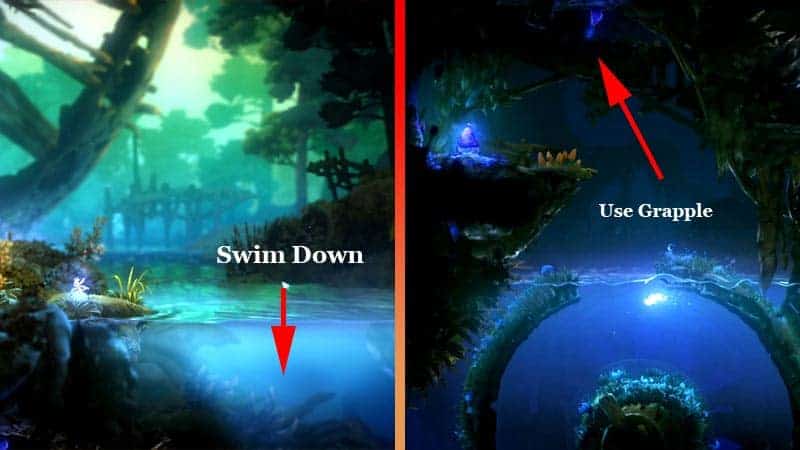
Requirement(s): Grapple, Clear The Wellspring (Purify the poisoned water)
Go to the entrance of The Wellspring and dive to the water to your right (refer to the image above).
Underwater, you should see a huge rotating wheel. Enter it, and once inside, move up and wait a few moments until you see an opening to exit it.
Once you exit it, use your Grapple ability to reach the platform holding the ore.
Silent Woods
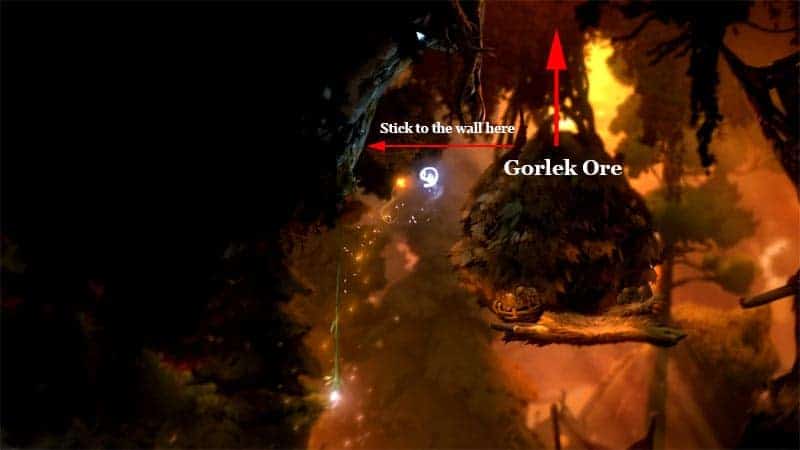
Location #20
Requirement(s): Ku’s Feather or Kuro
You can either do this while you’re controlling Kuro or by using Ku’s Feather if you missed it the first time.
Once you reach the area with a huge fire, glide upwards. The path will lead you to another path to your left.
Don’t go there yet.
Instead, look to your right and you should notice roots blocking the path to the Gorlek Ore.
Check out the image above for a better description of the location.
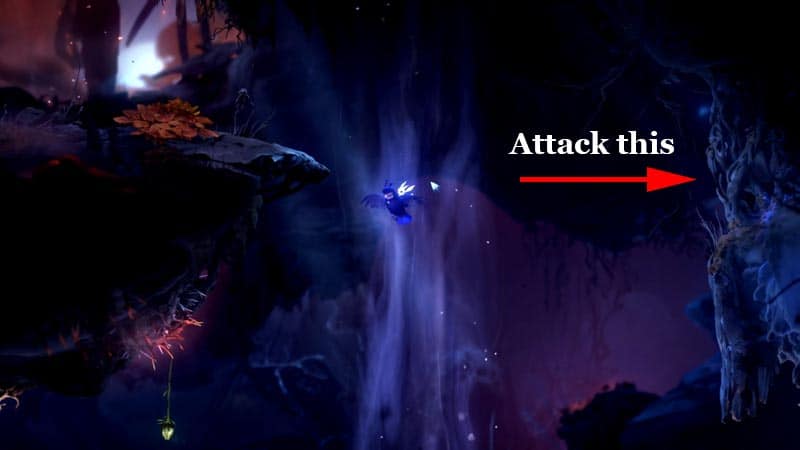
Location #21
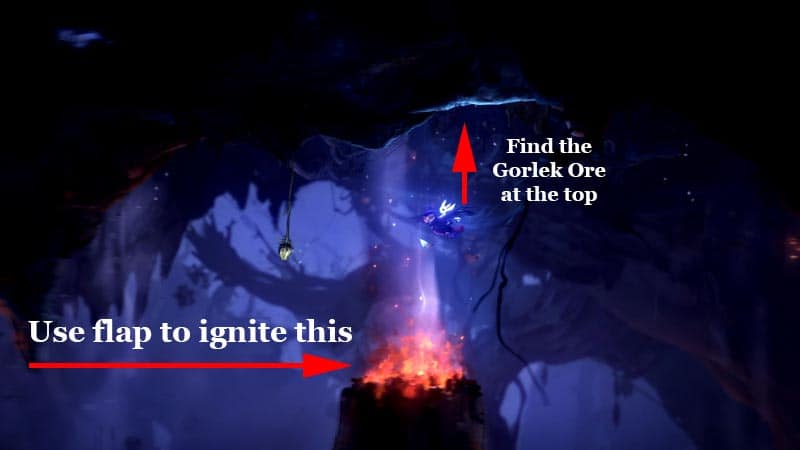
Requirement(s): Ku’s Feather or Kuro
You can find this in the next area just after location 1. Use Ku’s Feather or Kuro’s Flap to blow wind and ignite flames to the slightly burning coals.
Then glide upwards and you should discover a secret cave. To your left, you should see the ore.
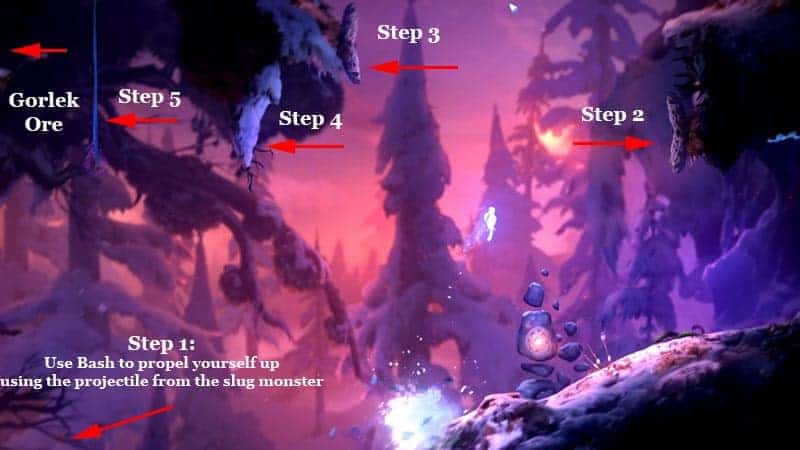
Location #22
Requirement(s): Ku’s Feather, Double Jump, Triple Jump
From Kii (The Tree Keeper), move to your left until you see a broken tree trunk. Go at the top of it then use double jump and triple jump going forward to your left to gain as much height as possible.
Then use Ku’s Feather to Glide all the way to the left until you reach the platform holding the Gorlek Ore.
Mouldwood Depths
Location #23
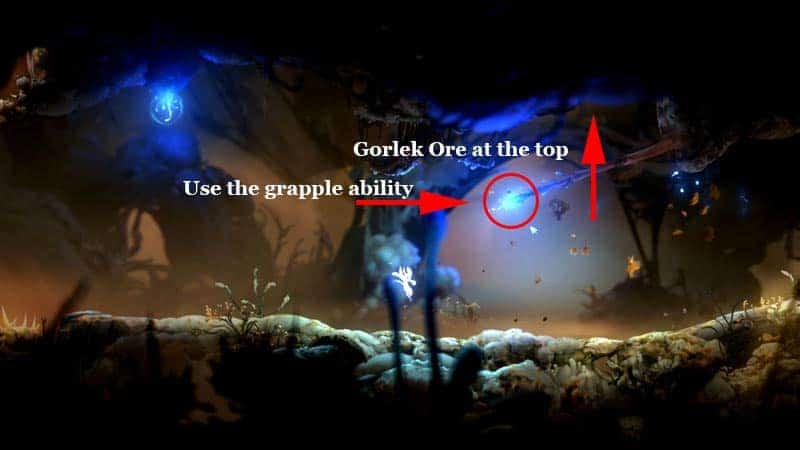
Requirement(s): Grapple
You can find this near the entrance of the Mouldwood Depths dungeon. As soon as you go down from the entrance, you will find two blue plants to your right.
Use your Grapple ability to the second blue plant then go the secret above it.
Location #24
Requirement(s): Double Jump
Go to the area indicated in the map above. And to your upper-right, you should notice a hanging lantern. Jump your way to the platform above and you should find the ore.
Note that this is a secret location so it may look like just a regular wall, but it’s not.
RELATED: All Shard Slot Upgrades in Ori and the Will of the Wisps
Baur’s Reach
Location #25
Requirement(s): Bash, Triple Jump (optional)
To reach this one, you will need to use your bash ability to propel yourself up. Then jump your way to reach the wall next to the vine monster to the upper left.
Then cling to its vine and it will pull you up. This will allow you to reach the platform holding the Gorlek ore at the far upper left corner.
Location #26

Requirement(s): None
Simply go down from the ledge next to the giant cauldron in the area specified in the image above. Once below, you should easily find the Gorlek Ore.
Location #27
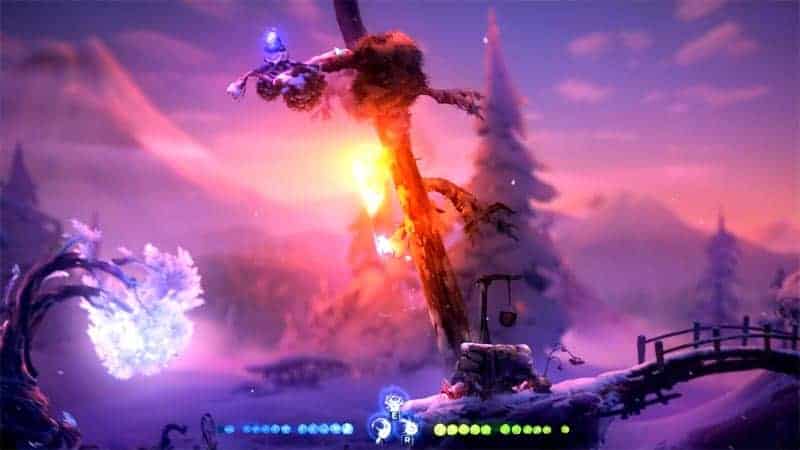
Requirement(s): Lightburst, Bash
To get this, position yourself at the top of the well. Then use the Lightburst upwards and Bash ability to reach the tree branch holding the ore at the top.
Location #28
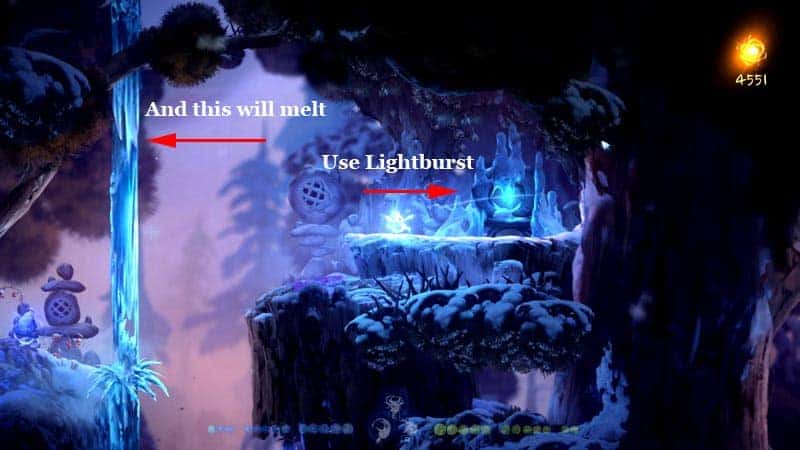
Requirement(s): Lightburst
You can this ore in the area with frozen water. At the top, you should see a blue altar.
Use the Lightburst ability and the frozen water to your left will melt. This will give you access to the Gorlek Ore beyond it.
Luma Pools
Location #29
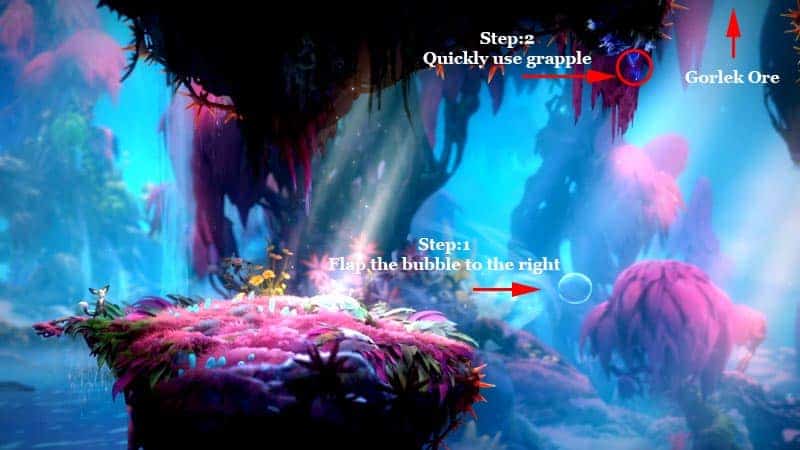
Requirement(s): Ku’s Feather, Grapple, Triple Jump (optional)
To get this, you need to position yourself to the left near the Moki. Then use Ku’s feather and flap the bubble to the right and quickly use the Grapple ability to get on top of the rising bubble.
Your goal is to get to the area above it so you can acquire the Gorlek Ore.
Location #30
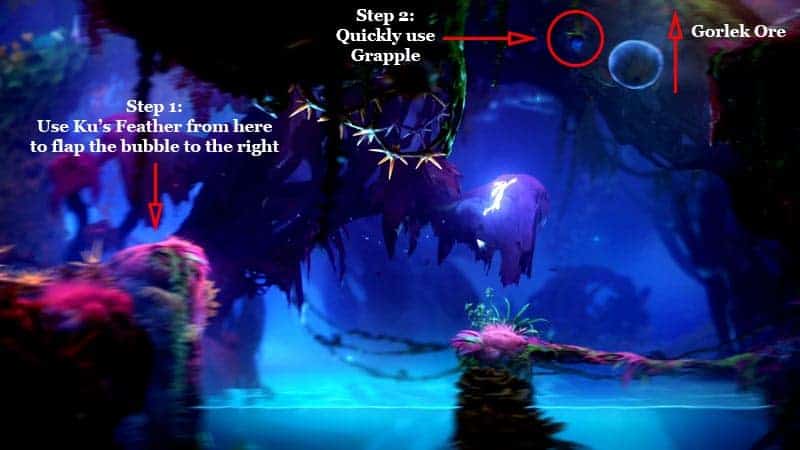
Requirement(s): Ku’s Feather, Grapple, Triple Jump (optional)
You have to apply the same concept as in the previous location for this one.
First, position yourself at the platform above the rising bubble. Then use Ku’s feather to flap the bubble rightwards. Then use double jump and Grapple ability so you can move on top of the bubble before it goes out of reach.
You may have to move a little faster for this than the previous one.
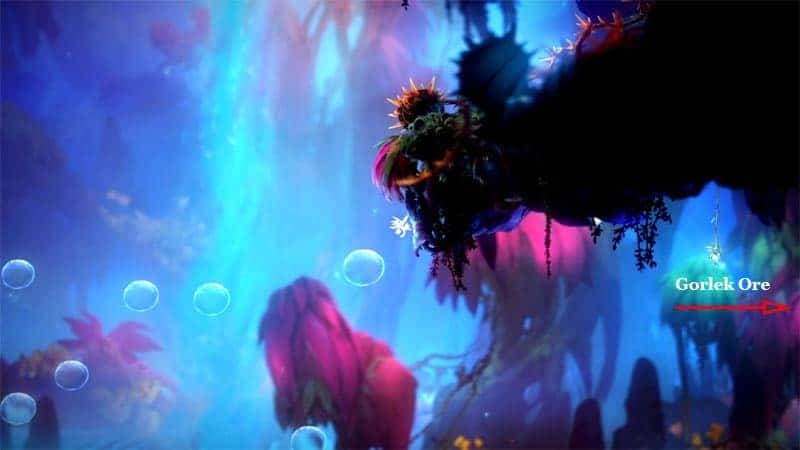
Location #31
Requirement(s): Water Breath (optional)
To get this, simply go to the area indicated on the map. Then swim down and to your left (near the bubble-spitting plant), there is a secret area.
Continue moving to the left and at the surface of it, you should be able to obtain the Gorlek Ore.
Location #32
Requirement(s): Bash, Dash, Triple Jump (optional)
You can get this on the upper right side of the area with lots of rising bubbles.
To get it, use the floating bubbles to reach the small wall below the thorns. Then use Double Jump and Dash to move rightwards until you reach a hanging glowing plant. Use Bash and propel yourself to the right, so you can reach the platform holding the ore.
Location #33
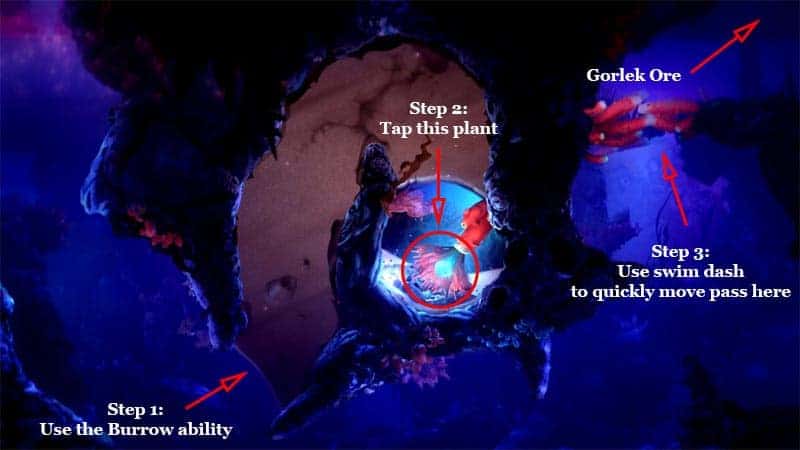
Requirement(s): Burrow, Swim Dash
To get this, go to the area indicated in the map above. Then swim down and to your lower right, you should see a small cave with lots of sands blocking it.
Use burrow to enter it then tap the blue and red-colored algae thingy. This should open the seaweeds blocking the path to your right.
You have to quickly move to the newly opened path using your Swim Dash ability. Otherwise, the seaweeds will block the path again and you’ll have to start over.
Windswept Wastes
Location #34
Requirement(s): Burrow
Once you have the Burrow ability, go back to the entrance of Windswept Waste. You should see a Gorlek ore buried under the sands.
Simply use the Burrow ability and you’re good to go.
Location #35

Requirement(s): Light Burst (optional), Bash (optional)
You can find this in a secret area near the sands bridge (area after you fought the corrupted Gorlek monster).
This is a secret area so simply go towards the seemingly dead-end path and get the Gorlek ore. Just note that the bridge will collapse as soon as you step on it so move fast to avoid falling.
If you did fall though, just use the Lightburst and Bash ability to reach the upper platform.
Location #36
Requirement(s): Burrow
Go to the area specified in the map above. Then use Double Jump and Burrow to propel yourself upwards.
Once you’re above the circle sands platform, you should see a crack wall to your right. Break it and obtain the ore beyond it.
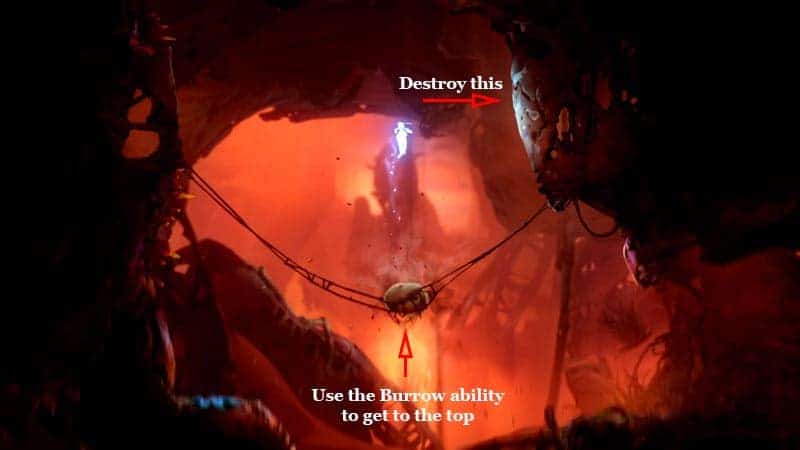
Location #37
Requirement(s): Burrow, Bash, Dash, Double Jump, Triple Jump, Sticky (optional)
This one is a little tricky. So let’s take this one step by step:
- Use the burrow ability and follow the path below until you encounter the missile-like monster.
- Lure the monster above the ground.
- Then once it is on the air, use the Bash ability to propel yourself upwards.
Make sure to position yourself just below the circle sand platform. - Use the Burrow ability to get on the top of the circle platform.
- Jump unto the glowing plant to your right.
- Use Bash to propel yourself to the upper left. (In about 80 degrees angle).
- Quickly use the Burrow ability again so you can get on top of the platform.
Once you’re at the top, you should now see the Gorlek ore to your left. - Use Double Jump, Triple Jump and Dash in quick succession so you can cling to the wall near the ore.
If you equipped the Sticky Spirit Shard, you should be able to cling to it without a problem.
Otherwise, just continuously jump so you won’t fall from the wall.
Weeping Ridge
Location #38
Requirement(s): Launch, Dash, Triple Jump (Optional but recommended)
Technically, this map is still within Silent Woods and everything you acquire here will further increase your map completion in Silent Woods.
Anyway, go to the position specified in the image above then use the Launch ability upwards. Once you get teleported, quickly maneuver yourself using the double, triple jump and dash ability so you can stick to the wall directly above the warp portal.
Then jump and stick to the wall to the opposite side. At the upper platform to your right, you should see the Gorlek ore.
Willow’s End
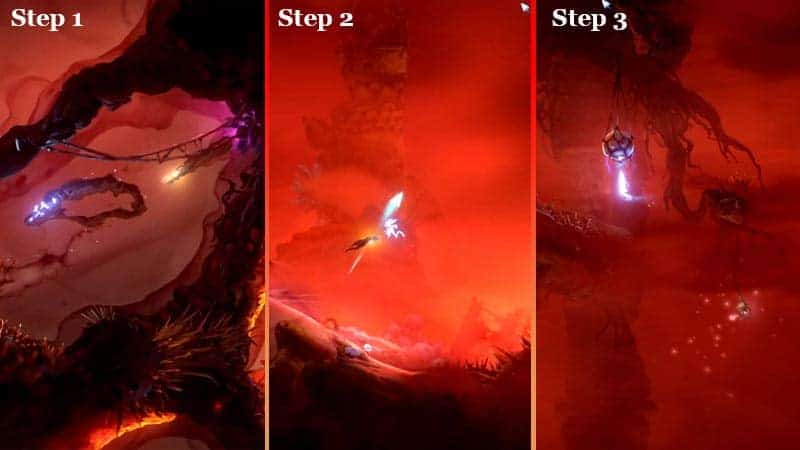
Location #39
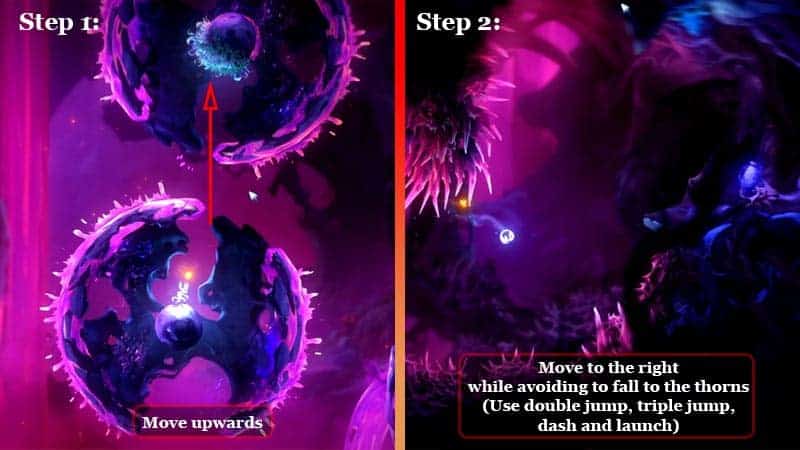
Requirement(s): Launch, Grapple, Double Jump, Dash (optional), Triple Jump (optional)
There a couple of steps to reach this ore:
- Go to the area specified in the image 3above.
- Jump into the circle platform inside the spinning wheel.
- Use the Launch ability and propel yourself upwards.
- Then quickly use the Grapple ability so you can cling to the blue moss in the circle platform of the huge spinning wheel above you.
- Watch your timing and use the Launch ability so you can reach the warp portal at the upper right corner.
You may have to use the Dash + Triple Jump ability if you mess this up.
Or start over if you really messed it up. - Once you enter the warp portal you will be teleported to an area without any footing. So quickly use Double Jump and move rightwards.
- Use the Launch ability to get into the platform holding the Gorlek Ore.
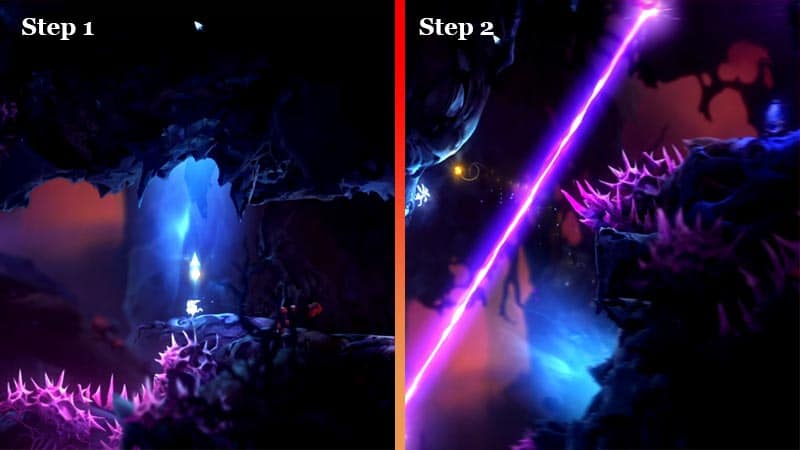
Location #40
Requirement(s): Ku’s Feather
In this location, simply use Ku’s Feather to navigate your way into the huge spinning circle platform.
Once inside, you should see the Gorlek Ore at the upper right corner of this area.
Timing is the key here or you’ll quickly lose your HP from the lasers and sticky pink substances.
Conclusion
Gorlek Ores are needed you want to get 100% completion on all maps. A lot of them can be found in a seemingly dead-end area so be mindful of those walls.
If this helps, please don’t forget to subscribe to our Youtube Channel or share this on your social media.


Thanks for all the work you put into this; it’s the best guide I’ve found so far. But on several points, you say “refer to the map above” and don’t provide a map, making it nearly impossible to know where you’re referring to.
Hi! Sorry about that, I could’ve sworn I put the map side-by-side with the actual location. But it seems that you’re right.
I lost my save file so it’s pretty hard for me to go back and take a screenshot.
Please forgive me, but I hope found it by now.