
Have you noticed that your character’s skill sometimes doesn’t apply elemental aura, impeding your ability to trigger continuous elemental reactions
This is primarily due to a hidden mechanic in Genshin Impact called Internal Cooldowns.
In this post, we’ll talk about how ICD works and share 3 tips on getting around it so that you can trigger elemental reactions as frequently as possible.
Content Overview
Video Guide
What is Internal Cooldown?
Internal Cooldown, also known as ICD, is a hidden mechanic that determines the frequency at which elemental attacks can apply auras to enemies in Genshin Impact.
Your character’s elemental skills, elemental bursts or element-infused normal attacks, operate on separate internal cooldowns, usually lasting about 2.5 seconds.
Let me give an example using Barbara’s attack on Pyro Hypostasis.
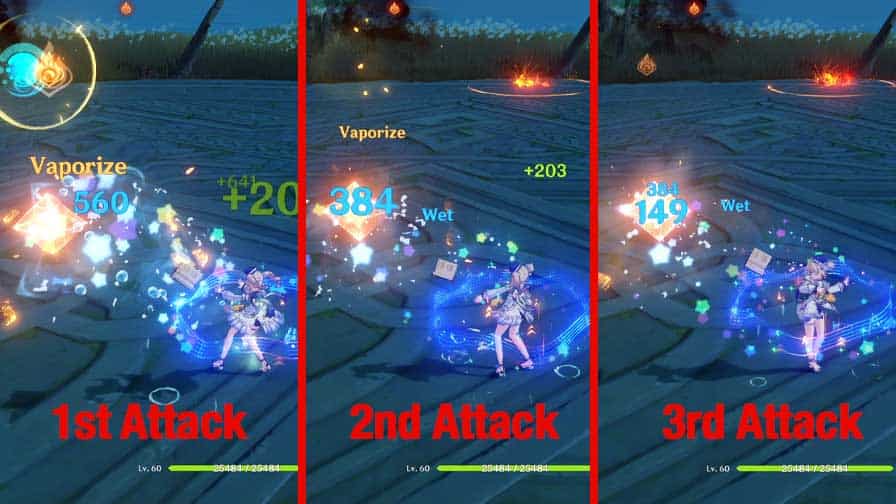
As indicated in the picture above, the 1st attack triggered the Vaporize reaction.
But the 2nd and 3rd attacks only inflicted Hydro damage without triggering an elemental reaction.
That’s because we are still under that 2.5-second internal cooldown.
It’s why some character skill combinations can’t trigger elemental reactions as much as you thought.
That said, there are a couple of ways to workaround internal cooldowns and trigger elemental reactions more frequently.
Let’s go with the first one:
1. Take advantage of the 3-Hit Rule.
As the name suggests, the 3-hit rule allows us to apply elemental aura after every third attack, regardless of whether the 2.5-second internal cooldown has passed.
In the example below, we timed Barbara’s normal attack to keep track of the ICD.
But on the 3rd-hit, we were able to trigger Vaporize even though the 2.5 seconds isn’t up yet.
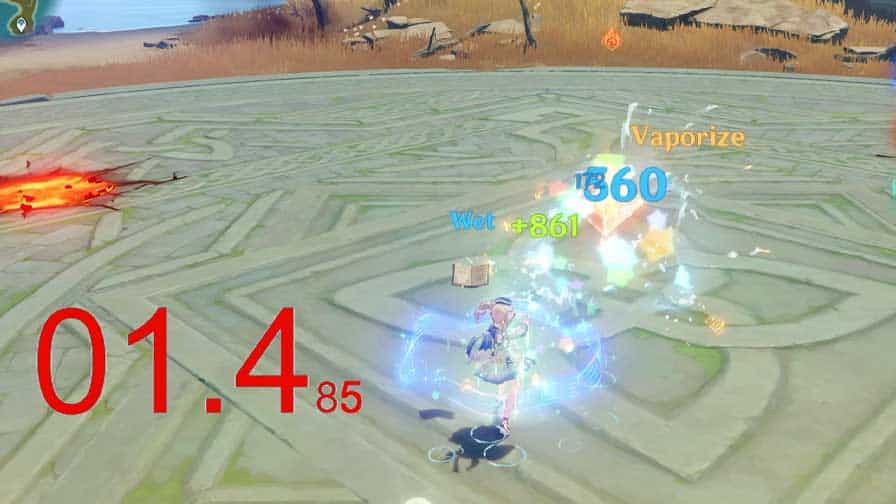
What’s great is that even though the 3-hit rule bypasses the ICD, it doesn’t reset the original internal cooldown.
In the example below, we managed to trigger an elemental reaction with just our 2nd consecutive attack.

Think of the 3-hit rule as a soft reset, allowing us to trigger elemental reactions before the internal cooldown is up but not interfering with the internal cooldown itself.
On the other hand, the actual internal cooldown is the Hard Reset.
It will take precedence over the 3-hit rule, applying elemental aura to enemies regardless of the number of hits you are currently at.
And once it triggers, our hit counter for the 3-hit rule will reset to 0.
2. Refine Your Skill Rotation
Elemental Skills, Elemental Burst and Normal Attacks each have their own internal cooldowns.
This means we can continuously apply elemental auras so long as we can cycle through skills effectively.
Let’s go with Klee for our demonstration for this one.
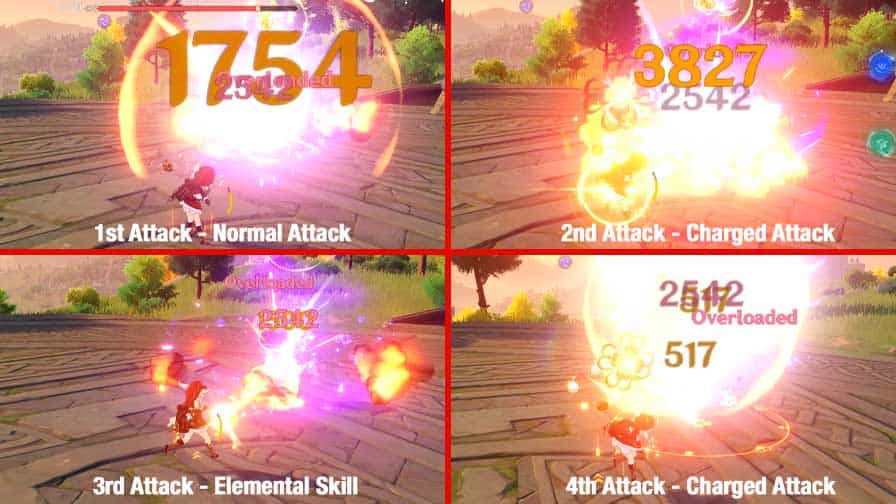
In the example above, we use Klees’s normal attack to trigger the Overloaded reaction on the first hit.
We followed it up with her charged attack, then elemental skill, then another normal attack and then another charged attack.
Each type of attack triggered an Overloaded reaction because we played the internal cooldowns just right.
This shows that you can trigger elemental reactions more frequently by switching from using normal attacks consecutively to mixing them up with elemental bursts or skills.
Keep in mind that many Claymore and Sword characters share an internal cooldown for their normal and charged attacks.
Moreover, skills that infuse regular attacks with elements, will adopt the default internal cooldown for their respective normal and charged attacks.
Examples of characters with this kind of skill are Yoimiya, Shao, Chongyun, and Raiden Shogun.
But we’re cheating a little here because we’re doing it on a monster with a permanent elemental aura.
In most cases, you will have to re-apply elemental status for you to trigger elemental reactions continuously.
This leads us to the next tip…
3. Take Advantage of Non-Standard Internal Cooldowns
So far, we’ve only seen characters with standard ICDs of 2.5 seconds.
But there are also characters with very fast ICD or no internal cooldowns.
An excellent example of this is Xiangling.
Xiangling’s elemental burst, the Pyronado, can apply a Pyro aura whenever it hits an enemy.
Polearm characters only have 0.5 seconds ICD for their charged attacks.
However, you’ll have to have a character that infuses elements to your attacks in order to execute elemental reactions.
Characters like Chongyun or Bennet at C6 can help you with this.
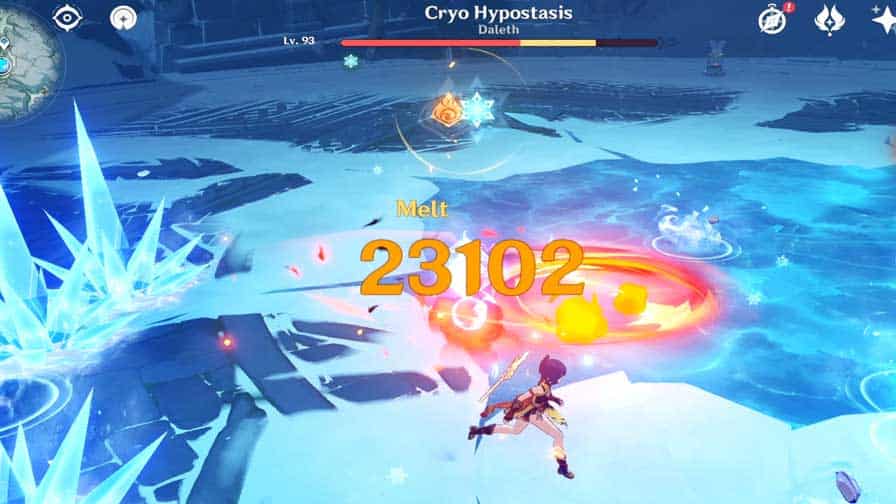
But there’s no better character to exploit this mechanic than Hu Tao.
(Show Hu Tao Vaporize Showcase 1.mov)
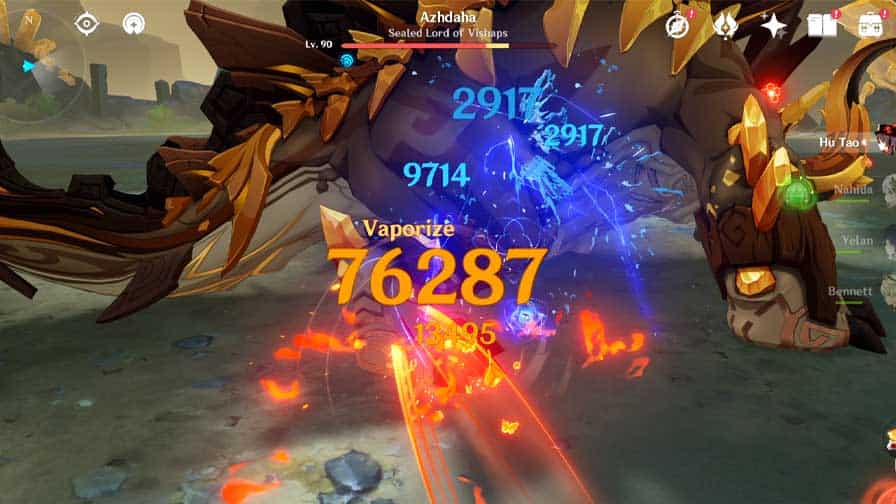
In addition to infusing her normal attacks with the Pyro element, she boasts a remarkably fast attack speed and receives substantial attack bonuses depending on her remaining HP.
Furthermore, she benefits from that 0.5-second charged attack internal cooldown, and gains additional damage from Blood Blossom.
It’s one of the reasons why Hu Tao is such a strong main DPS.
There are also characters that have shorter than normal ICDs such as Venti.
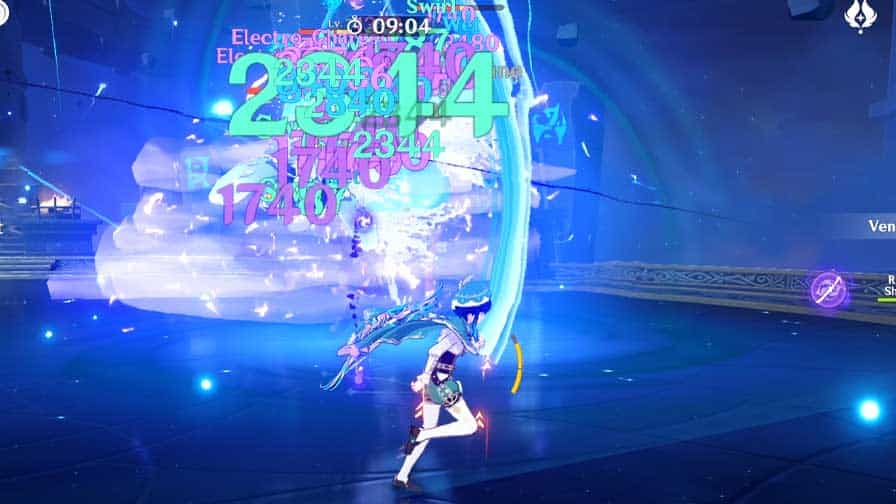
Venti’s elemental burst hits at a fast interval, with a 1-second ICD.
This allows him to trigger various elemental reactions throughout the skill’s duration.
Other skills with equally impressive ICDs include:
- Nahida’s Tri-Karma Purification, which has a fast ICD of 1 second.
- Rosaria’s elemental burst, which has no internal cooldown.
- And Kokomi’s elemental skill, which also has no ICD.
On the other hand, all plunging attacks have no internal cooldown.
Currently, no character can take full advantage of this aside from Xiao.
But just because a character has a skill with no ICD doesn’t automatically make them great for your team comp
For example, charged attacks of catalyst and bow users do not have ICD.
But a fully charged aimed shot will take a few seconds to charge up, while charged attacks of catalyst users consume a lot of stamina.
So they are, in a way, already have rate limitations.
Amber’s elemental burst only has 1 second ICD, like Venti. But its duration and hit rate is way lower than Venti.
Plus, its AoE is not that great.
So you still have to take a deeper look at the character’s mechanics before adding them to your team.
Skill Internal Cooldown List:
| Character Name | Elemental Skill | Elemental Burst | Normal Attack | Charged Attack | Plunging Attacks | Special Sprint |
|---|---|---|---|---|---|---|
| Albedo | Activation: No ICD Transient Blossoms: 2.5 Seconds or 3 Hits | Elemental Burst Damage: No ICD Fatal Blossom Damage: 2.5 Second or 3 Hits | 2.5 Seconds or 3 Hits | Shares With Normal Attack | No ICD | N/A |
| Alhaitham | Rush Attack: No ICD MIrror Projection: 12 seconds or 2 Hits | 2.5 Second or 3 Hits | 2.5 Seconds or 3 Hits | 2 Seconds | No ICD | N/A |
| Aloy | Freeze Bomb: No ICD Chillwater Bomblet: 2.5 seconds or 3 Hits Element Infusion: Shares With Normal Attack | 2.5 Second or 3 Hits | 2.5 Seconds or 3 Hits | No ICD | No ICD | N/A |
| Amber | No ICD | 1 Second or 3 Hits | 2.5 Seconds or 3 Hits | 1 Second or 3 Hits | No ICD | N/A |
| Arataki Itto | No ICD | Element Infusion: Shares With Normal Attack | 2.5 Seconds or 3 Hits | Shares With Normal Attack | No ICD | N/A |
| Baizhu | 2 Seconds | Spiritvein: No ICD | 2.5 Seconds or 3 Hits | No ICD | No ICD | N/A |
| Barbara | Activation: 2.5 Seconds or 3 Hits On-contact Application: 2.5 Seconds or 3 Hits | N/A | 2.5 Seconds or 3 Hits | No ICD | No ICD | N/A |
| Beidou | No ICD | Activation Damage: No ICD Lightning Discharge: 2.5 Seconds or 3 Hits C4: 2.5 Seconds or 3 Hits | 2.5 Seconds or 3 Hits | Shares With Normal Attack | No ICD | N/A |
| Bennett | No ICD | No ICD | 2.5 Seconds or 3 Hits | Shares With Normal Attack | No ICD | N/A |
| Candace | No ICD | No ICD | 2.5 Seconds or 3 Hits | 0.5 Seconds | N/A | |
| Chongyun | No ICD, including Passive A4 | No ICD | 2.5 Seconds or 3 Hits C1 Effect: No ICD | Shares With Normal Attack | No ICD | N/A |
| Collei | No ICD, including C6 Paasive A1: 2.5 seconds or 3 hits | 3 Seconds | 2.5 Seconds or 3 Hits | No ICD | No ICD | N/A |
| Cyno | Skill Damage: 0.2 Seconds Skill Damage (During Element Burst): No ICD Duststalker (Passive A1): 2.5 Seconds Duststalker (C6): 2.5 Second or 3 Hits | Activation: No ICD Element Infusion: Shares With Normal/Charged Attack | 2.5 Seconds or 3 Hits | 0.5 Seconds or 3 Hits | No ICD | N/A |
| Dehya | No ICD | Flame-Mane's Fist: 2.5 Seconds or 3 Hits Incineration Drive: No ICD | 2.5 Seconds or 3 Hits | Shares With Normal Attack | No ICD | N/A |
| Diluc | No ICD | 5 Seconds or 5 Hits | 2.5 Seconds or 3 Hits | Shares With Normal Attack | No ICD | N/A |
| Diona | 2.5 Seconds or 3 Hits | 2.5 Second or 3 Hits | 2.5 Seconds or 3 Hits | 2.5 Seconds or 3 Hits | No ICD | N/A |
| Dori | 2.5 Seconds or 3 Hits | Connector Damage: 3 Seconds Jinni Toop (C2): 2.5 Seconds or 3 Hits | 2.5 Seconds or 3 Hits | Shares With Normal Attack | No ICD | N/A |
| Eula | Press/Hold Damage: No ICD Icewhirl Brand: 2.5 Seconds or 3 hits | No ICD | 2.5 Seconds or 3 Hits | Shares With Normal Attack | No ICD | N/A |
| Faruzan | No ICD | No ICD | 2.5 Seconds or 3 Hits | No ICD | No ICD | N/A |
| Fischl | Summon Damage: No ICD Thundering Retribution (Passive A1 and A4): No ICD Oz's Attack: 5 seconds or 4 Hits Coordinated Attacks (C6): 5 seconds or 4 Hits | 5 seconds or 4 Hits | 2.5 Seconds or 3 Hits | No ICD | No ICD | N/A |
| Ganyu | No ICD | 2.5 Seconds or 3 Hits | 2.5 Seconds or 3 Hits | No ICD | No ICD | N/A |
| Gorou | No ICD | Activation: No ICD Crystal Collapse: 2.5 Seconds or 3 Hits | 2.5 Seconds or 3 Hits | No ICD | No ICD | N/A |
| Hu Tao | Blood Blossom: No ICD | No ICD | 2.5 Seconds or 3 Hits | 0.5 Seconds | No ICD | N/A |
| Jean | No ICD | No ICD | 2.5 Seconds or 3 Hits | Shares With Normal Attack | No ICD | N/A |
| Kaedehara Kazuha | No ICD | No ICD | 2.5 Seconds or 3 Hits | Shares With Normal Attack | No ICD | N/A |
| Kaeya | No ICD | 2.5 Seconds or 3 Hits | 2.5 Seconds or 3 Hits | Shares With Normal Attack | No ICD | N/A |
| Kamisato Ayaka | No ICD | Bloom Damage: No ICD Cutting Damage: 2.5 Seconds or 3 Hits | 2.5 Seconds or 3 Hits | 0.5 Seconds | No ICD | Special Sprint: 2.5 Second or 3 Hits |
| Kamisato Ayato | Water Illusion Damage: No ICD Shunsuiken: Shares With Normal Attack Extra Shunsuiken: No ICD | 2.5 Seconds or 3 Hits | 2.5 Seconds or 3 Hits | 0.5 Seconds | No ICD | N/A |
| Kaveh | No ICD | Skill Damage: No ICD Element Infusion: Shares With Normal Attack | 2.5 Seconds or 3 Hits | Shares With Normal Attack | No ICD | N/A |
| Keqing | Lightning Stilletto: No ICD Slashing Damage: 2.5 Second or 3 Hits Thunderclap Damage: 2.5 Second or 3 Hits Extra AoE (C1): 2.5 Seconds or 3 Hits Element Infusion (Passive A1): Shares With Normal Attack | 2.5 Seconds or 3 Hits | 2.5 Seconds or 3 Hits | Shares With Normal Attack | No ICD | N/A |
| Kirara | Tail-Flicking Flying Kick (Press): No ICD Urgent Neko Parcel (Hold): 2.5 Seconds or 3 Hits Flipclaw Strike: No ICD | Activation: No ICD Cat Grass Cardamom: 2.5 Seconds or 3 Hits | 2.5 Seconds or 3 Hits | Shares With Normal Attack | No ICD | N/A |
| Klee | Jumpy Dumpty (Bounce): 2.5 Seconds or 3 Hits Mines: 2.5 Seconds or 3 Hits | Sparks Damage: 2.5 Seconds or 3 Hits Explosion Damage (C4): No ICD | 2.5 Seconds or 3 Hits | No ICD | No ICD | N/A |
| Kujou Sara | No ICD | Activation: No ICD Stormcluster: 2.5 Seconds or 3 Hits Weaker Crowfeather (C2): No ICD | 2.5 Seconds or 3 Hits | No ICD | No ICD | N/A |
| Kuki Shinobu | Skill Damage: 2.5 seconds or 3 Hit Grass Ring of Sanctification: 2.5 seconds or 3 Hit Thundergrass Mark (C4): No ICD | 2.5 Seconds or 3 Hits | 2.5 Seconds or 3 Hits | Shares With Normal Attack | No ICD | N/A |
| Layla | Skill Damage: No ICD Shooting Star Damage: 3 seconds or 7 Hits | 2.5 Seconds or 3 Hits | 2.5 Seconds or 3 Hits | Shares With Normal Attack | No ICD | N/A |
| Lisa | Press Damage: 2.5 Seconds or 3 Hits Hold Damage: No ICD | Activation: No ICD Discharge Damage: 2.5 Second or 3 Hits | 2.5 Seconds or 3 Hits | No ICD | No ICD | N/A |
| Mika | Flowfrost Arrow Damage: No ICD Rimestar Flare Damage: 2.5 Seconds or 3 Hits Rimestar Shard Damage: 2.5 Seconds or 3 Hits | N/A | 2.5 Seconds or 3 Hits | 0.5 Seconds | No ICD | N/A |
| Mona | Damage Over Time: 2.5 Seconds or 3 Hits Explosion Damage: No ICD | 2.5 Seconds or 3 Hits | 2.5 Seconds or 3 Hits | No ICD | No ICD | Special Sprint: 2.5 Second or 3 Hits Extra Explosion Damage (Passive A1): No ICD |
| Nahida | Press/Hold Damage: No ICD Tri-Karma Purification Damage: 1 Second Karmic Oblivion (C6): 2.5 Seconds or 3 Hits | N/A | 2.5 Seconds or 3 Hits | No ICD | No ICD | N/A |
| Nilou | 2.5 seconds or 3 hits Tranquility Aura: 1.9 Second or 4 Hits | No ICD | 2.5 Seconds or 3 Hits | Shares With Normal Attack | No ICD | N/A |
| Ningguang | Skill Damage: No ICD | 2.5 Seconds or 3 Hits | 2.5 Seconds or 3 Hits | 2.5 Seconds or 3 Hits Star Jade: Shares With Charged Attack | No ICD | N/A |
| Noelle | Skill Damage: 2.5 Seconds or 3 Hits Extra Damage (C4): 2.5 Seconds or 3 Hits | 2.5 Seconds or 3 Hits Element Infusion: No ICD | 2.5 Seconds or 3 Hits | Shares With Normal Attack | No ICD | N/A |
| Qiqi | Skill Damage: 2.5 Seconds or 3 Hits Herald of Frost: 2.5 Seconds or 3 Hits | No ICD | 2.5 Seconds or 3 Hits | Shares With Normal Attack | No ICD | N/A |
| Raiden Shogun | Skill Damage: No ICD Coordinated Attack Damage: 2.5 Second or 3 Hits | Activation Damage: No ICD Converted Attacks (Except Plunging): 2.5 Seconds or 3 Hits Converted Attacks (Plunging): No ICD | 2.5 Seconds or 3 Hits | Shares With Normal Attack | No ICD | N/A |
| Razor | Press/Hold Damage: No ICD Hold Damage (During Elemental Burst): No ICD | Activation Damage: No ICD Soul Companion Extra Hit: 2.5 Seconds or 3 Hits Extra Lightning (C6): No ICD | 2.5 Seconds or 3 Hits | Shares With Normal Attack | No ICD | N/A |
| Rosaria | No ICD | No ICD | 2.5 Seconds or 3 Hits | 0.5 Seconds | No ICD | N/A |
| Sangonomiya Kokomi | No ICD | No ICD | 2.5 Seconds or 3 Hits | No ICD | No ICD | N/A |
| Sayu | Fuufuu Windwheel (Anemo): 2.5 Second or 3 Hits Fuufuu Windwheel (Elemental Absorption): 2.5 Second or 3 Hits Fuufuu Whirlwind Kick: No ICD | Activation: No ICD Damage Over Time: 2.5 Seconds or 3 Hits | 2.5 Seconds or 3 Hits | Shares With Normal Attack | No ICD | N/A |
| Shenhe | Press: 0.1 Seconds Hold: No ICD | Activation: No ICD Damage Over Time: 2.5 Seconds or 3 Hits | 2.5 Seconds or 3 Hits | 0.5 Seconds | No ICD | N/A |
| Shikanoin Heizou | No ICD | No ICD | 2.5 Seconds or 3 Hits | No ICD | No ICD | N/A |
| Sucrose | No ICD | No ICD | 2.5 Seconds or 3 Hits | No ICD | No ICD | N/A |
| Tartaglia | Stance Switch Damage: No ICD Riptide Slash Damage (Melee Stance): No ICD Melee Stance Normal Attack: 2.5 Seconds or 3 Hits Melee Stance Charged Attack: 2.5 Seconds or 3 Hits | No ICD, Melee or Ranged | 2.5 Seconds or 3 Hits Riptide Burst: No ICD | Aimed Shot: No ICD Riptide Flash (Ranged): 2.5 Seconds or 3 Hits Charged Attack (Melee): 2.5 Seconds or 3 Hits | No ICD | N/A |
| Thoma | No ICD | Activation: No ICD Fiery Collapse: 2.5 Seconds or 3 Hits | 2.5 Seconds or 3 Hits | 0.5 Seconds | No ICD | N/A |
| Tighnari | No ICD | Tanglevine Shaft Damage: 2.5 Seconds or 3 Hits Secondary Tanglevine Shaft Damage: 2.5 Seconds or 3 Hits | 2.5 Seconds or 3 Hits | Aimed Shot: No ICD Clusterbloom Arrow: 2.5 Seconds or 3 Hits Additional Clusterbloom Arrow (C6): No ICD | No ICD | N/A |
| Venti | No ICD | 1 Second or 3 Hits | 2.5 Seconds or 3 Hits | No ICD | No ICD | N/A |
| Wanderer | Activation Damage: No ICD Kuugo: Fushoudan Hits: 2.5 Second or 3 Hits Wind Arrow (Passive A4): 1 Second | 2.5 Seconds or 3 Hits | 2.5 Seconds or 3 Hits | No ICD | No ICD | N/A |
| Xiangling | No ICD | Activation: 2.5 Seconds or 3 Hits Pyronado: No ICD | 2.5 Seconds or 3 Hits Additional Pyro Damage (C2): No ICD | 0.5 Seconds | No ICD | N/A |
| Xiao | 0.1 Second | Element Infusion: Shares With Normal/Charged Attack | 2.5 Seconds or 3 Hits | 0.5 Seconds | No ICD | N/A |
| Xingqiu | No ICD (2 Hits) Hydro Application on Contact: No ICD | 2.5 Seconds or 3 Hits Hydro Application on Contact: No ICD | 2.5 Seconds or 3 Hits | Shares With Normal Attack | No ICD | N/A |
| Xinyan | Swing Damage: No ICD Damage Over Time: No ICD | Activation: No ICD Subsequent Pyro Hits: 2.5 Seconds or 3 Hits | 2.5 Seconds or 3 Hits | Shares With Normal Attack | No ICD | N/A |
| Yae Miko | Sesshou Sakura: 2.5 Second or 3 Hits | No ICD | 2.5 Seconds or 3 Hits | No ICD | No ICD | N/A |
| Yanfei | No ICD | No ICD | 2.5 Seconds or 3 Hits | No ICD | No ICD | N/A |
| Yaoyao | White Jade Radish Damage: 2.5 Seconds or 3 Hits Mega Radish Damage (C6): No ICD | Activation: No ICD Adeptal Legacy White Jade Radish: 1.5 Seconds | 2.5 Seconds or 3 Hits | 0.5 Seconds | No ICD | N/A |
| Yelan | No ICD | Activation: No ICD Exquisite Throw: 2.5 Seconds or 3 Hits Additional Water Arrow (C2): No ICD Converted Attacks: 2.5 Seconds or 3 Hits | 2.5 Seconds or 3 Hits | Aimed Shot: No ICD Breakthrough Barb: 0.3 Seconds | No ICD | N/A |
| Yoimiya | Element Infusion: Shares With Normal Attack | Activation: 2.5 Seconds or 3 Hits | 2.5 Seconds or 3 Hits | Aimed Shot: No ICD Kindling Arrows: 2.5 Second or 3 Hits | No ICD | N/A |
| Yun Jin | Press/ Charge Level 1-2: No ICD | No ICD | 2.5 Seconds or 3 Hits | 0.5 Seconds | No ICD | N/A |
| Zhongli | Press/Hold/Resonance: 2.5 Second or 3 Hits | Press/Hold/Resonance: 2.5 Second or 3 Hits | 2.5 Seconds or 3 Hits | 0.5 Seconds | No ICD | N/A |
| Anemo Traveler | Press/Hold Storm Damage: No ICD Cutting Damage: 2.5 Seconds or 3 Hits | Activation: 2.5 Seconds or 3 Hits Aurous Blaze Explosion: 2.5 Seconds or 3 Hits | 2.5 Seconds or 3 Hits Additional Anemo Damage (Passive A1): No ICD | Shares With Normal Attack | No ICD | N/A |
| Geo Traveler | Skill Damage: 2.5 Second or 3 Hits Explosion (C2): 2.5 Second or 3 Hits | Shockwave: 2.5 Seconds or 3 Hits Final Hit: No ICD | 2.5 Seconds or 3 Hits Additional Geo Damage (Passive A4): No ICD | Shares With Normal Attack | No ICD | N/A |
| Electro Traveler | 2.5 Second or 3 Hits | Activation: No ICD Falling Thunder: 2.5 Seconds or 3 Hits | 2.5 Seconds or 3 Hits | Shares With Normal Attack | No ICD | N/A |
| Dendro Traveler | No ICD | Default: 2.5 Seconds or 3 Hits Elemental Transformation: 2.5 Seconds or 3 Hits | 2.5 Seconds or 3 Hits | Shares With Normal Attack | No ICD | N/A |